Showing posts with label real life wedding. Show all posts

Monday, June 17, 2019

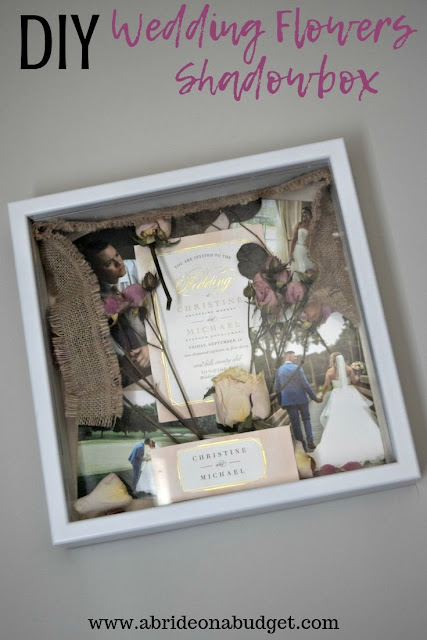
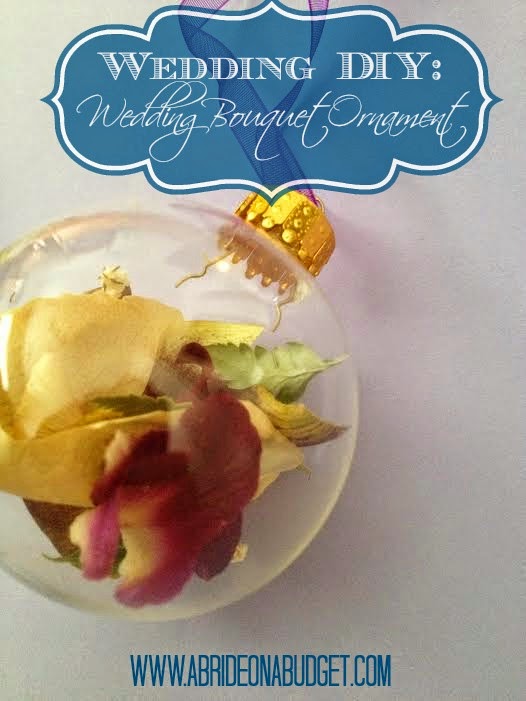
DIY Wedding Flowers Shadowbox

The day after my brother and his wife got married, they were heading off on a Mediterranean cruise. As we were saying our goodbyes in the hotel, my brother's wife handed her bouquet to my mom in case we were able to do something with the flowers. And, if not, no worries, she said. I immediately thought about a DIY Wedding Flowers Shadowbox.

See, when we got married, I preserved my flowers using silica gel. Well, not exactly my flowers.

We stayed the night at the hotel where our reception was, and when we got home, I realized that I left my bouquet in the room. We called immediately upon noticing, but they were gone. It broke my heart because I wanted to save them. So Pete actually called our florist and had them recreate and then deliver my wedding bouquet. And I was able to preserve those and use them in the projects I had intended.

I didn't want to make my brother's wife the same exact thing I made for myself, so I decided to use a few of their wedding items to create a full wedding shadowbox. It came out even better than I could have imagined.

Preserve your wedding items with a beautiful DIY Wedding Flowers Shadowbox. Get the tutorial to make one on www.abrideonabudget.com.

DIY Wedding Flowers Shadowbox


What You'll Need:


What You'll Do:

As soon as possible, put the entire bouquet in a large plastic bag and tie it shut. I would recommend a small garbage bag with a knot tied at the top. You want to keep out as much air as possible so the flowers don't start oxidizing and discolor I got.

Then, keep the bag in the fridge until you've purchased your silica gel and container. That will also delay the discoloration of the petals. You can, honestly, keep it that way for a month, but the sooner you make it, the better.

This is a two part process. The first involves preserving the flowers in silica gel, which takes two weeks. The second is the assembly of the wedding flowers shadowbox. So, keep in mind that if you do want to make this for yourself or offer to make this for someone, it's not a project that will be completed quickly.

To Preserve The Flowers:

Take the bouquet from the fridge and remove it from the bag.

Carefully, unwrap any ribbon or burlap from the handle. It may be attached by pins, so look out for those. Don't throw these away. You'll use these to decorate the shadowbox later.

Very gently separate the flowers and any baby's breath or greenery. The petals are so delicate and may start falling off if you're too rough.

Preserve your wedding items with a beautiful DIY Wedding Flowers Shadowbox. Get the tutorial to make one on www.abrideonabudget.com.

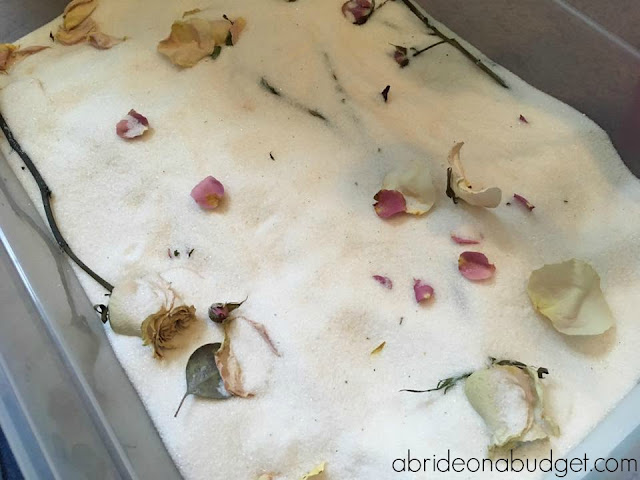
Fill the bottom of an airtight container with a layer of silica gel.

Place in a layer of flowers, baby's breath, and greenery on the silica gel. Cover that completely with another layer of silica gel. Add another layer of flowers and greenery, then another layer of silica gel.

Preserve your wedding items with a beautiful DIY Wedding Flowers Shadowbox. Get the tutorial to make one on www.abrideonabudget.com.

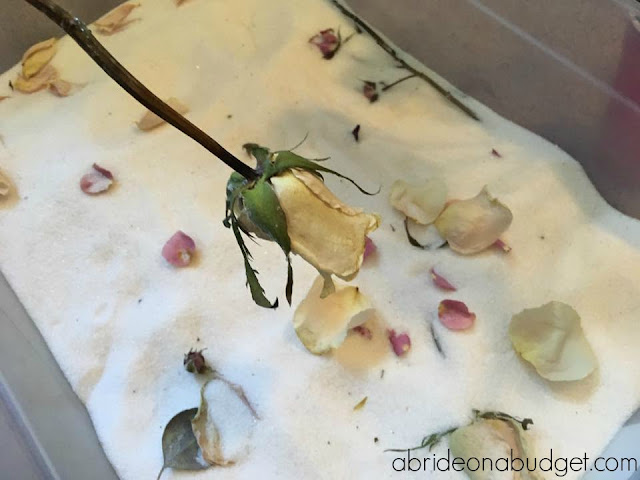
If you're preserving flowers like roses, you'll want to pour some the silica gel directly into the top of the flower before (gently) placing it in the box. This will help it hold its shape better and will preserve the inner petals as well.

Leave the box in a dry spot for two weeks.

After they've sat, carefully remove the flowers from the silica gel being sure to discard any silica gel that is between the petals. You can pour the silica gel from the box into a large airtight, zip-top plastic bag and reuse it. I've used mine a few times in the last five years.

Preserve your wedding items with a beautiful DIY Wedding Flowers Shadowbox. Get the tutorial to make one on www.abrideonabudget.com.

Individually spray each flower and piece of greenery with a layer of triple thick clear glaze. One layer is enough, but be sure to get both sides (and the inside of the flowers). Store them upright until they've dried. Overnight is best.

To Make The Wedding Shadowbox:

Preserve your wedding items with a beautiful DIY Wedding Flowers Shadowbox. Get the tutorial to make one on www.abrideonabudget.com.

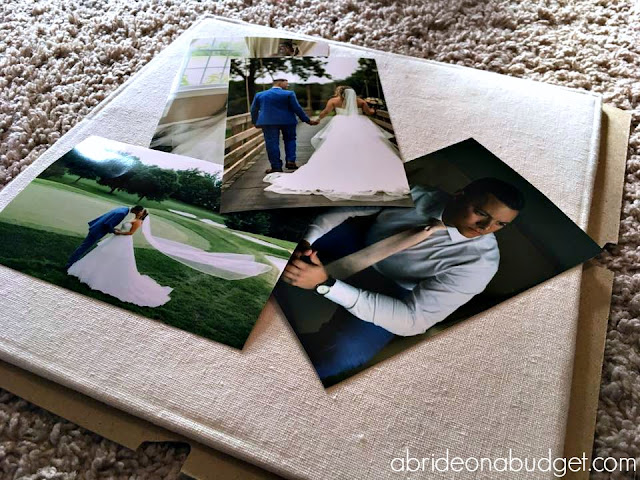
In the two weeks you're waiting for your flowers, print a couple of wedding photos from the couple and accumulate any wedding accessories you can: the invitation, the save the date, wine corks, escort card holders, etc. Of course, some of that takes pre-planning.

Preserve your wedding items with a beautiful DIY Wedding Flowers Shadowbox. Get the tutorial to make one on www.abrideonabudget.com.

Take out the backside of the shadowbox and arrange your photos, accessories (including the burlap and ribbon), flowers, and greenery.

Preserve your wedding items with a beautiful DIY Wedding Flowers Shadowbox. Get the tutorial to make one on www.abrideonabudget.com.

Once you have everything arranged, you'll be able to decide if you need to trim the stems off the flowers and greenery or the burlap/ribbon.

Try to keep things like the invitation or save the date as is.

Preserve your wedding items with a beautiful DIY Wedding Flowers Shadowbox. Get the tutorial to make one on www.abrideonabudget.com.

Once you have everything as you want it, use the double-sided tape to hold down the burlap or ribbon. Then, if you have something like an invitation wrap, affix that to the front of the box.

Preserve your wedding items with a beautiful DIY Wedding Flowers Shadowbox. Get the tutorial to make one on www.abrideonabudget.com.

Add a few petals on the bottom of the box to add a little depth.

Preserve your wedding items with a beautiful DIY Wedding Flowers Shadowbox. Get the tutorial to make one on www.abrideonabudget.com.


Use the pins to affix everything else down. For the flowers, try to put two pins per (short) stem, then another two in the flower itself. You can glue everything down if you prefer, but I prefer the airy feeling the pins provide.

Preserve your wedding items with a beautiful DIY Wedding Flowers Shadowbox. Get the tutorial to make one on www.abrideonabudget.com.

Put the back on the shadowbox and double check to make sure nothing moved before you close it.

Hang it on the wall.

Preserve your wedding items with a beautiful DIY Wedding Flowers Shadowbox. Get the tutorial to make one on www.abrideonabudget.com.

BRIDAL BABBLE: What would you add to this DIY Wedding Flowers Shadowbox?

Want other ideas for your wedding flowers?


Wednesday, November 28, 2018

Do You Need A Wedding Map?

Chances are, you have a GPS in arm's reach right now. (Is your smart phone close?) And, if you don't, you probably have one in your car. Because of this, I often get asked if you need to include directions in your wedding invitations. Do you need a wedding map when directions just a few button pushes away?

Directions have turned into a cost that brides are hoping to eliminate. Plus, if you have a GPS in your pocket, you're probably going it ask it for directions instead of consulting the card that came with your invitation.

Do you need a wedding map? Get some good advice and answers in this post from www.abrideonabudget.com.

So do you need a directions card?

Simply put, no. You don't need to include it. But honestly, you don't need anything at your wedding except your spouse-to-be. You can argue against any part of your wedding (you don't need to serve dinner; you don't need to give out favors; and you definitely don't need that unity candle. Skip that, please, but keep dinner).

Honestly, though, no. You don't need a directions card, especially if you're like us and book a shuttle to drive your guests to and from the hotel and reception. If your guests aren't driving, they definitely don't need directions. I would (and did), however, replace that with a wedding map.

If your guests are unfamiliar with the area, they can still find their way from the hotel to the venue with a GPS. But they can't find their way around town if they don't know where to go. If they want a snack between the ceremony and reception, or if they just want to go sightseeing, they need help. And you're off being very newly married. You can't help them.

But a wedding map can.

Nicole from Glossie (who designed our full invitation suite) designed us a small map to include with our invitations. It was the size of our RSVP card and had a few landmarks noted on it (the airport, the hotel, the church, the reception venue, and the park where our rehearsal dinner was). We enclosed one with each wedding invitation and mailed it.

Do you need a wedding map? Get some good advice and answers in this post from www.abrideonabudget.com.

Then, Carol from CW Designs, who is the best wedding map designer I know, created a full-size customized wedding map for our wedding welcome bags.
Do you need a wedding map? Get some good advice and answers in this post from www.abrideonabudget.com.

The front was similar to the map in the wedding invitation in that it highlighted the same locations. And that's really important. Even if you don't give your guests directions, you want to give them a sense of where they are. The map that Carol designed us also included our apartment, the restaurant where we got engaged, and a local brewery that we thought our guests would like.

The back of the map, though, was the star.

Our guests were mostly coming from New York to our North Carolina wedding. Many of them had never been to our town before and most were staying for a week. We wanted to help them have the best experience possible.

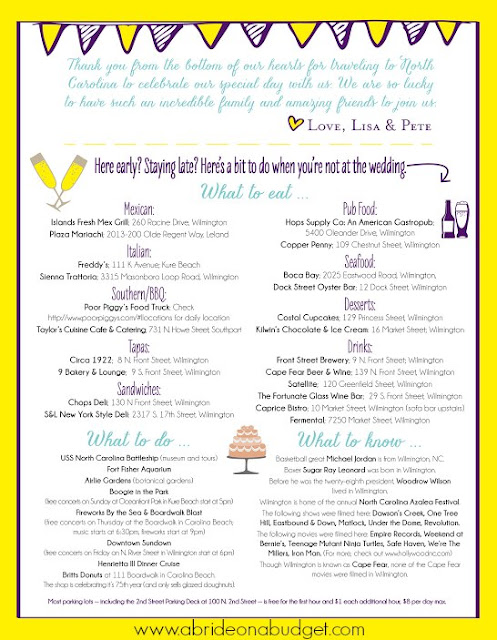
So Pete and I sat down and went through the (many) restaurants in our area to choose our favorites. We broke them down by cuisine (Mexican, Italian, Southern/BBQ, Tapas, Sandwiches, Pub Food, Seafood, Desserts, and Drinks). We picked our top two restaurants (except for drinks; we went with six there). We had the name of the restaurant and the address under the "What to eat ... " section.

Do you need a wedding map? Get some good advice and answers in this post from www.abrideonabudget.com.

Then, there was a "What to do ... " section where we listed a few of the more interesting tourist locations. 

And the final section was "What to know ... " We live in Wilmington, NC, which is dubbed both Hollywood East and Film-ington. Studios film here. A lot. So we mentioned a few TV shows and movies that were filmed here (One Tree Hill, Empire Records, etc.). And then we gave a few other facts (Michael Jordan is from here, for example). We both like to know about places we visit, so this was our way to give some facts to our guests and let them know where they are.

And then, at the very bottom of the map, we let them know how to get free parking downtown. Because who doesn't like free. I sent all the information to Carol and she formatted it and made it look pretty. 

Do you need a wedding map? Get some good advice and answers in this post from www.abrideonabudget.com.

The map is way out of my skill set. I probably could format the back of it now, since I'm way better at graphic design than I was four years ago, but a DIY wedding map is something I absolutely have no idea how to do. Sometimes, you need to go to the professionals.

I'm not sure how much of our list our guests actually used (because we had four days of wedding activities, so we did sort of monopolize their time a lot), but I got such compliments on these wedding maps. I never once heard someone say they wished we included a directions card in our invitation, despite the fact that I was adamant on having one, but I did hear a ton of people gush about our wedding maps.

Do you need a wedding map? Get some good advice and answers in this post from www.abrideonabudget.com.

Side note: I actually used the wedding map illustration to create a throw pillow. It was on our futon in the living room for years (first in our apartment, then in our house) until we got a grown up couch and the futon moved upstairs. The pillow moved with it.

BRIDAL BABBLE: If you were making a wedding map, what information would you include?

Wednesday, November 7, 2018

Wedding Cigar Bar Action Station Idea

I think about each wedding I've been to and they've all been amazing in their own way. They all stand out in my mind (which is a feat in itself since, for a while, Pete and I got invited to more weddings that I think the average couple does). But there's only I've ever been to with a wedding cigar bar. Yup, my cousin Erica's wedding had one.

A Wedding Cigar Bar is a super unique action station. Find out all about them on www.abrideonabudget.com.

Her wedding was beautiful. I was honored to be in her wedding party and to get to spend the entire day with her. I was at her house early and got to see her transform into a beautiful bride. That in itself was memorable. The limo ride to the church was memorable, as was sitting in the front row, watching her say "I do."

That was almost five years and two kids ago. And still, I can remember her action station vividly. And that's what you want to give people. You want one moment that they will remember, years later.

For Erica's wedding, it was the wedding cigar bar.

A Wedding Cigar Bar is a super unique action station. Find out all about them on www.abrideonabudget.com.

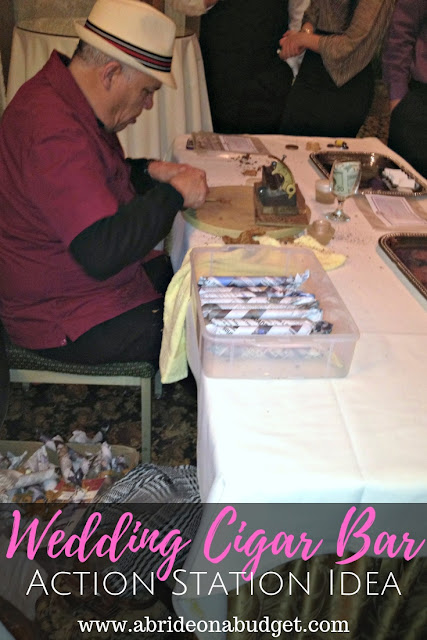
For a few hours during the reception, a cigar roller came in and did his thing. It was incredible to watch him unroll the leaves, stuff them, cut them, and affix each cigar with a sticker bearing the couple's name and wedding date.

He did this all by hand, alone, and we were able to watch his precision, and his time.

It was a really cool thing to experience. I've never seen a cigar station at a wedding before.

A Wedding Cigar Bar is a super unique action station. Find out all about them on www.abrideonabudget.com.

My cousin's uncle goes to this cigar roller on a regular basis, so that's how he ended up at my cousin's wedding. 

If you don't know a guy, but you do like the idea, you could set up a DIY cigar bar wedding station. Purchase cigars, order personalized cigar labels, and use them as a wedding "extra" (I wouldn't say favor because there are probably a lot of guests who wouldn't smoke a cigar).

But Pete, he was a fan of the cigar. Plus, many of the men went outside and smoked them during the wedding. So that was a nice time for them to bond.

A Wedding Cigar Bar is a super unique action station. Find out all about them on www.abrideonabudget.com.

If cigars aren't your thing, you should still find a way to make your wedding unique. 

Have a band, have a Venetian hour, ride in on a horse. Whatever it is, do something that your guests will remember a year or two later.

Us? We had a shrimp and grits action station, a candy bar, and a band. But what people remember the most is the fact that we had a delicious, chocolate cake.

BRIDAL BABBLE: What's the most memorable thing you've seen at a wedding?

Monday, August 27, 2018

DIY Wedding Card Box

This DIY Wedding Card Box post is written by Lisa's mom Cathy of the travel blog Life Of 2 Snowbirds.

Our baby, Mike, is getting married!

We are so happy for him and so excited to welcome a very sweet, kind, and adorable young lady -- Chrissy -- into our family. Their wedding is next month, so I made them a DIY wedding card box.

It is a tradition for me to create these boxes for each of our children to use on their special day. It started with my making a homemade card box for my daughter Lisa, the owner of this blog, four years ago and then for our older son six weeks later! (Yes. They really did do that to us -- but it was wonderful!)

I thought, as I was making this box, that there might be A Bride On A Budget readers who would like a tutorial on making something for their guests to deposit their cards into. I took pictures while I worked on the box so that I could do this guest post. Normally, you would find me posting on my own blog, Life Of 2 Snowbirds. (Hey, had to get a shout out in there somehow!!)

Personalize your wedding by making this DIY Wedding Card Box! Get the instructions at www.abrideonabudget.com.

DIY Wedding Card Box


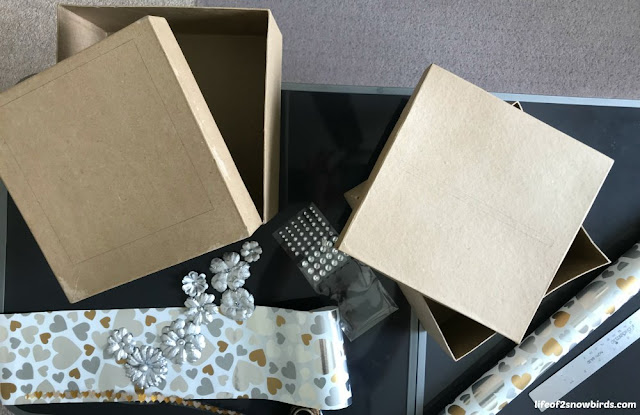
I ordered the cardboard boxes from this online. The set I ordered had three, but I only used two of the three boxes for this project.

If you need a three-tier card box, you can still follow these DIY wedding card box instructions. You'll just have to add an extra layer. It'll be easy to figure out once you start getting into these steps.

Personalize your wedding by making this DIY Wedding Card Box! Get the instructions at www.abrideonabudget.com.

What You'll Need:

What You'll Do:

Personalize your wedding by making this DIY Wedding Card Box! Get the instructions at www.abrideonabudget.com.
Cut out openings.

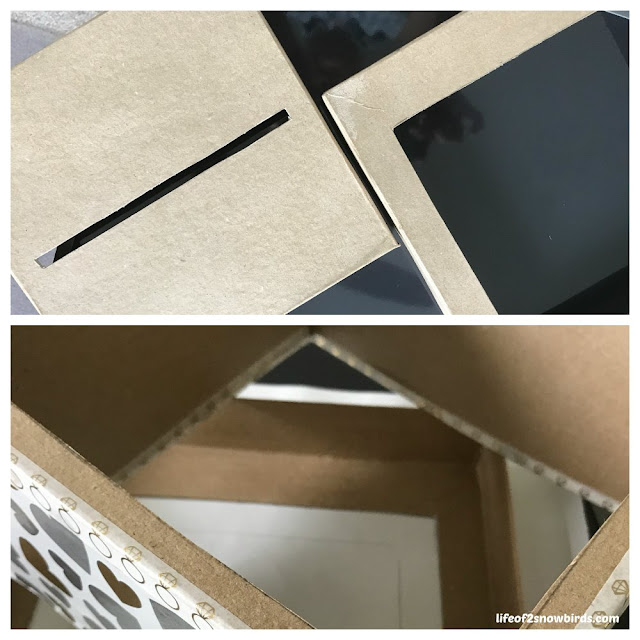
Using your ruler, measure an opening in the lid of the smallest box approximately 1/4-inch wide by 7.5-inches long.  This is the slit for the cards to enter the box.  I measured mine to end up in the middle of the lid, but where you want the opening is up to you.

Next take the smaller box and place it on the lid of the larger box. I placed my boxes with the backs of the boxes flush, but you can place your smaller box in the middle of the larger box if you prefer.

Lightly trace the outline of the smaller box onto the lid of the larger box. Now, make this outline 1/2-inch smaller on all sides. Measure and draw your new lines. Cut along these inner lines with your box cutter.

You'll end up with a piece of cardboard from the lid of the larger box.

Take the piece of cardboard and place it in the center of the bottom of the smaller box. Trace around it. Cut along these lines with your box cutter to make a matching hole in the bottom of the smaller box.

Personalize your wedding by making this DIY Wedding Card Box! Get the instructions at www.abrideonabudget.com.
Wrap boxes.

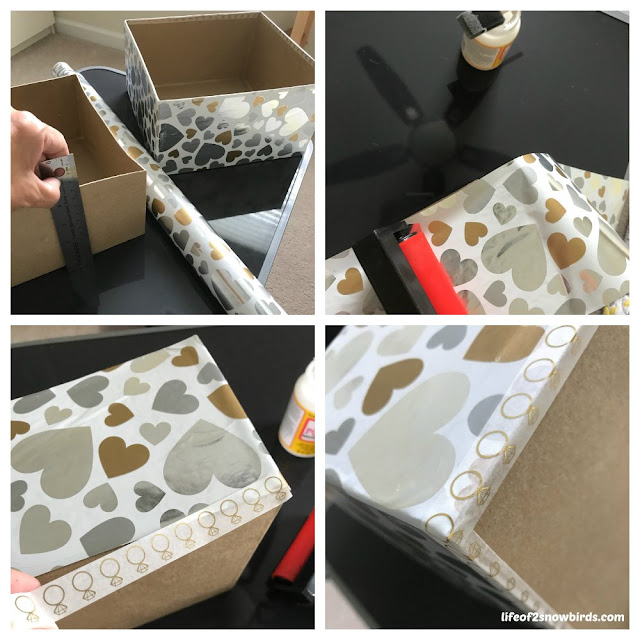
Measure the height and total length (which means all four sides total) of each box then measure and cut a strip of wrapping paper this size to wrap around each box. You'll want to add about 1/2-inch extra to the length of the wrapping paper so the ends of the strip overlap slightly.  You will be hiding this seam in the back of your finished box.

Brush one side of the box with Mod Podge and place one end of the wrapping paper on it. Press down and adjust as necessary. Use your roller to get the air bubbles out from underneath the paper before you continue to the next side of the box. Repeat until all sides are glued down.

Do this to both boxes.

Use Washi tape to give a finished, clean look to the bottom and top edges of each box.

Note: I love using Washi tape because it is easily removable if you didn't get it on right the first time. It stays sticky even after pulling it off a couple of times. It also is sticky enough to stay on the box, but not sticky enough to rip the wrapping paper when it's being removed.

Personalize your wedding by making this DIY Wedding Card Box! Get the instructions at www.abrideonabudget.com.

Wrap lid of small box.

Place the lid of the smaller box on the wrapping paper.  Measure and draw lines 2-inches from the edge of all sides of the lid. Cut the wrapping paper along your lines.

Take the lid off the paper and Mod Podge the top only (You will be gluing the sides of the lid later.) Place the lid back on the center of the paper and press down. Flip the lid over so you are looking at the top side, and roll over the wrapping paper with the roller to get the air bubbles out.

Turn box lid over (you are now looking at the underside of the lid) and cut a slit, with your box cutter, in the center of the card entry opening.  Carefully fold the edges of the wrapping paper through the slot and use the Washi tape to hold them down.

Draw a straight line from the corner of the box straight to the edge of the wrapping paper (see top right picture). This will make a rectangle. Cut off each rectangle. Mod Podge the wrapping paper one side at a time. Fold the paper over the side and into the lid. Use the roller to flatten and repeat with all four sides.
Personalize your wedding by making this DIY Wedding Card Box! Get the instructions at www.abrideonabudget.com.
Wrap lid of large box.

The top of the larger box has a large cutout at this point.  Make sure you are gluing the box and not the wrapping paper.

Just like with the smaller lid, measure the lid and draw lines 2-inches from the edge of all sides of the lid. Cut the wrapping paper along your lines, then glue it in the same manner you did the smaller lid.

Then, following the instructions for the smaller lid, glue down the sides.

You will now be cutting away the center of the wrapping paper.

You will want to cut this piece 1" smaller, on all sides, than the opening. Measure and draw lines. Cut out a square (and discard it). Cut the wrapping paper diagonally at each corner. Mod Podge each edge of the paper, one side at a time, fold back and glue down onto box.

Use Washi tape on the corners of both lids to add some embellishment and to hide your seams.


Personalize your wedding by making this DIY Wedding Card Box! Get the instructions at www.abrideonabudget.com.

Put the two boxes together.

Hot glue around the cutout of the larger box.


Line up the opening on the bottom of the smaller box to the opening on the large box. Place the smaller box on top of the large box. 

Clip the boxes together with binder clips for a more secure bond. Remove clips when bonded.

Now the fun part.


Personalize your wedding by making this DIY Wedding Card Box! Get the instructions at www.abrideonabudget.com.

Get your creative juices going and decide how you might want to decorate your box.

I was planning to buy ribbon to wrap around the bigger box and then add a large flower to put on the front center of it. When I went to the store to find this flower that I had visions of, it didn't exist. So I just wandered around the store with a scrap of the wrapping paper I used for the box and finally found beautiful paper flowers that matched the wrapping paper perfectly.

I also found stick on "bling" to add sparkle. Plus, I already had the heart tape. I decided that I wanted Chrissy and Mike's names and wedding date on the box and simply typed it out and printed it on card stock.

I can't believe this is the last box I'll be making, but that means all of my kids have found their soulmates. And that means that their mom's wish for them has come true!


BRIDAL BABBLE: Do you think you could make this DIY Wedding Card Box?

Monday, May 21, 2018

5 Memorial Wedding Ideas (to honor your loved ones)

Memorial Day Weekend always makes me think of my grandpa. He was stationed in Japan during the Korean War and that's where he met my grandma. If not for his service, I wouldn't be here.

I know, Memorial Day is for those who died while serving and Veteran's Day is for men and women like my grandpa who served and came home. But still, for both holidays, I think of him.

He passed years before my wedding, before ever getting the chance to know Pete. And, unfortunately, that is how life goes sometimes. People who we want to be at our wedding are sometimes watching from Heaven.

At weddings, you can honor these people. We put together a list of five ways that you can do so.

How are you honoring your loved ones at your wedding? This post from www.abrideonabudget.com has five great ideas.

5 Memorial Wedding Ideas (to honor your loved ones)


1. Memorial Table
If you have photos of your loved ones, you probably have thought of wedding memorial table ideas. There's a simple way to do this. Frame photos and put them on a table with a bouquet of flowers. You can make a sign that says something like, "We know you would be here today if Heaven wasn't so far away" (you can pick one up the wedding memorial poem on Amazon here) and set that in a frame along with the photos. Put the table in a well trafficked area so your guests can visit with those guests.

The table in the photo above was at our friends' Shawna and Frank's wedding. It was so classy and tastefully done. Plus, after the wedding, they could put those framed photos in their home to display them.

2. Flowers To Mary
If you're having a church ceremony, you can do flowers to Mary. Basically, you and your fiance (or husband, depending on what time in the ceremony your presentation is done) walk flowers to a statue of Mary and say a Hail Mary silently as a devotion. This is often done in memory of a loved one, although you don't ever have to say who specifically. That's between you and Mary.

In the same vein, you could light a memorial candle at the church in memory of your loved one.

3. Donation
If you have a  loved one who recently passed, in lieu of favors, you can do a donation in their memory. It can be to a charity that your loved one supported, an organization that is searching for a cause if your loved one had an illness, etc. Whatever you think is best. Just create small cards to go on each table to let your guests know that instead of favors, this is what you're doing.

A photo posted by Lisa (@abrideonabudget) on

4. Accessories
Pete wore pink ribbon cufflinks in memory of his mom. In a way, she was with him all day long. We also had calla lilies in my bouquet and as Pete's boutineer since that was his mom's favorite flower.

You could also purchase a bouquet memory charm and add your loved one's photo to it. Little things like this, that no one really knows but you, are really special. They're a way of remembering loved ones at your wedding ceremony without making a big to do about it.

5. Reserved chairs
What you can do at the ceremony is put a reserved sign on seats, meaning those are reserved for your loved ones who couldn't make it. I thought about doing this at ours, but looking out into the church and seeing a big gap would have been too hard for us. I have seen it done with photos of your loved ones too, but for me, it would be too hard.

Actually, this is what the Internet thought happened at Prince Harry and Meghan Markle's Royal wedding. There was an empty seat next to Prince William, and the Internet gasped, assuming the photo was for the late Princess Diana. That's not true, even though it sounds beautiful.

Instead, the chair was left empty because it was directly in front of Queen Elizabeth. Any chair that would be blocking her view would be left empty. So it was not for Diana, it was for the Queen's convenience.

BRIDAL BABBLE: Which of these memorial wedding ideas is your favorite?

Wednesday, April 18, 2018

Real Life Wedding: Sarah's DIY Homemade Wedding Bouquets

I was just going through the blog, looking for DIY homemade wedding bouquets for someone. I completely forgot about this post from when Sarah was planning her wedding. So, of course, it's getting a little update ... almost five years later.

Five. Years.

Man, I've been at this wedding blog thing for a long time.

You can make your own bouquet if you want. Get inspired by this DIY Homemade Wedding Bouquets post. Get all the details at www.abrideonabudget.com.

I was on Twitter five (!!!) years ago, talking to Sarah (@cpss_girl) and she let me know she was in the process of making the bouquets for her August 2013 wedding.

It was over a month away at that point. There was no way she could be using real flowers, so I had to figure out what she was up to.

This I had to see.

I asked Sarah if she could tweet me a photo after the wedding. I didn't want her to give up any surprises, but she shared with me right away. And oh my gosh.

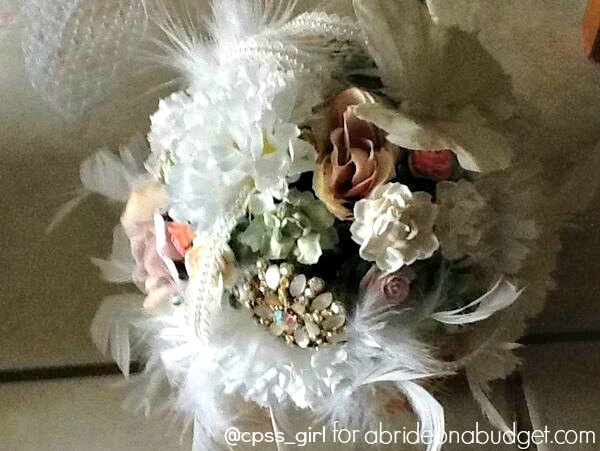
Her bouquets were gorgeous. They look straight out of a bridal magazine. There is something so absolutely breathtaking and incredibly romantic about them. There is no way I would have been able to envision these on my own, let alone sit down and figure out a way to create them.

When you've got a talent, you sure do have a talent.

I'll be honest. When I read her description, I was a little skeptical. I had no idea how she was going to get so many elements into her creations. I've heard of a brooch bouquet before, but those are pretty much just pins. They don't contain multiple elements. I was worried her bouquet was going to look cluttered.

My mind was absolutely blown when I saw the photos.

You can make your own bouquet if you want. Get inspired by this DIY Homemade Wedding Bouquets post. Get all the details at www.abrideonabudget.com.

If you have a talent like Sarah's, absolutely use it. This is exactly how you make your wedding your own. There is no way you can go to the florist and buy this. You buy the florist's vision and her creation. By doing it yourself, your creation is coming to life. And the fact that she incorporated brooches from her grandmothers, oh, what a sweet tribute to the women in her life.

I just really am, still, years later, in absolute awe of what she has created.

She spent under $5,000 for her 250 to 275 guest wedding. It can be done. And doing things yourself, that makes it happen.

But, keep in mind: This is not a simple wedding bouquets DIY. This is a lot of work, time, and effort. DIY doesn't mean it's easy, and it doesn't mean it saves you any time.

So. if you don't have skills in some department, don't do it. If you can't visualize a brooch bouquet (or a similar one) and bring it to life like Sarah, don't do it. You will come out with a mess. Spend your money there. But, if you can design your own save the date cards, go right ahead and do that. Make what you can, buy what you can't, and you will have a gorgeous wedding (at a price you can afford).

BRIDAL BABBLE: What do you think of Sarah's DIY homemade wedding bouquets?

Wondering how to make wedding bouquets with fresh flowers?

diy-wedding-bouquets

Friday, August 5, 2016

Wedding Door Hangers

A Bride On A Budget received these items for review. All thoughts and opinions belong to ABOAB.

I was on Pinterest once upon a time and saw wedding door hangers. They were so cute. You add them to your wedding welcome bag so your guests can hang them on the hotel doors the day after the wedding.

Looking for a fun wedding idea? Create these wedding door hangers. Get all the details at www.abrideonabudget.com.

I was determined to have these.

I looked all over, though, and couldn't find wedding-related companies that actually made these. I found ones that printed similar items, and found companies that tried to get me to print on other items and then DIY the rest, and I even thought about printing as 4x6 prints at the drugstore and cutting them.

And then I found door hangers at 123Print. That's not the only product at 123Print, though. You can get full stationery suites, starting from save the dates and ending at thank yous ... plus everything in-between. For every item, you can use a pre-made design and edit to add your own information, or you can upload your own image.

Personally, I knew I wanted to design my own door hangers. See, the ones that are pre-made are mostly for businesses, since they usually hang these door to door for advertising. The pizza chain here hangs one on our door once a week, at least. There's no way the pizza chain and I needed the same template, so it was easier for me to just head to PicMonkey, design, and upload my design.

You have to understand that these are not print at home items, so you won't get them as immediately as you would if you printed them on your own printer. You do have to wait for the designer to set it up, print, and ship. It took mine a bit longer than a week to arrive. I wasn't in a rush, so that was fine with me, but this isn't something you should save until the last minute.

Looking for a fun wedding idea? Create these wedding door hangers. Get all the details at www.abrideonabudget.com.

When they did arrive, they were perfect. They were bundled in sets of three and, since there was room between the product's edge and the box's, there was tissue paper stuffed between. That way, the product didn't shuffle around in the mail and get ruined. I was super happy about that -- and would definitely have felt secure ordering wedding invitations from them.

With wedding stationery, you do want it to be perfect and want to assure that the corners aren't rounded (unless that's the style you picked, of course).

Looking for a fun wedding idea? Create these wedding door hangers. Get all the details at www.abrideonabudget.com.

I pulled one out of the box, and it was perfect. That's the only word I can use to describe it.

The door hanger was printed on a glossy paper, so it has this beautiful shine to it. And it just looks really, really expensive. They're not, but they look that way (which is exactly what you want for your wedding).

I expected these to be printed on matte cardstock. Why, I don't know. I couldn't actually find anything about paper type when I ordered, but I just expected it. So you can understand why this glossy paper surprised me.

Looking for a fun wedding idea? Create these wedding door hangers. Get all the details at www.abrideonabudget.com.
The door hangers come with the door hole left it and it's up to you to pop them all out (or don't, if you don't have the patience, but then you run the risk of your guests not using them and that would be a waste of your money). If you were to try to print these at home, you would  literally have to cut every door hole. You wouldn't be able to just drop these in your wedding welcome bags and expect your guests to have packed scissors in their suitcases. So even though popping these holes out might seem tedious, it's easier than DIY and cutting (and this is coming from the girl who spent 13 hours cutting wedding invitations).
I'm seriously so impressed with the quality of the door hangers that I feel completely confident that all the other products the site provides are "wedding quality."

BRIDAL BABBLE: Would you order these wedding door hangers for your wedding?

Thursday, July 28, 2016

What You Need To Get Your Marriage License

Pete had an appointment to go to, so I took a ride downtown with him. I had about an hour to kill, so I decided to open Pokemon Go and look for Pokestops (because, yes, I ran out of Pokeballs and catching Pokemon without them is impossible). I didn't catch any Pokemon without Pete because it just didn't feel right, but walking around, getting steps, and collecting Pokeballs so we could play after his appointment sounded okay with me.

As I was walking, I passed the register of deeds where we got our marriage license. I remembered that I didn't even think about picking it up until a handful of days before our wedding, and then I freaked out worrying that we had waited too long.

We got to the registrar of deeds in time ... but Pete didn't have his social security card on him so we had to go back home and come back.

A slight hiccup, but one that could have been easily avoided. And you can avoid that. I'm here to help.

Did you get you marriage license yet? Do you know where and when to get it?  Find out everything you need to know from www.abrideonabudget.com.

What You Need To Get Your Marriage License


  • A spouse-to-be. You can start the application online in some states, but you and your spouse-to-be will each need to show up in person together to finish your application for a marriage license. 
  • Identification. In each state, the requirements are different. In North Carolina, we needed a valid photo ID (like a driver's license or passport) and a social security card (or a form with our social security number, like a pay stub). If we got married in New York (where we're from), we would have just needed ID and proof of age. No social security card.
  • Money. Yes, you have to pay for this. Each state charges a different amount. In North Carolina, we had to pay $60 -- half was for the fee and half went to North Carolina Domestic Violence programs.
  • Time. Or not, actually. In New York, you have to wait 24 hours after your application is filed and your license is issued to get married. In Pennsylvania (where I used to live too), it was three days. In North Carolina, you can use it right away. So, you definitely want to look this up because you might not be able to apply and then turn around and get married. And if you wait until the last minute, you're in trouble. But, you're also in trouble if you go too soon. In many states, the license is only valid for 60 days. So if you go too early, you'll  have to start over (and pay again).
  • Proof of a divorce/death, if you were married previously. Although, if we're being honest, if you were married before, you went through this before and you're probably not reading this list. But, just in case, if you've been married before and divorced or your spouse passed away, you need to bring proof of that.
  • A reliable person to marry you. You'll have a priest marry you at a church, but you can go with an ordained minister if you choose to get married somewhere else. Choose who fits you best (and who is allowed by the state where you're getting married), but make sure they're reliable. That person usually will have witnesses sign your license, sign it after performing the ceremony, and then send it to the appropriate clerk so you can get your actual license in the mail. You need that, so make sure this person will send it off for you (or will give it to you to sign off).

BRIDAL BABBLE: Are you planning on taking the (what seems to be, anyway) obligatory photo with your marriage license? 

Tuesday, April 5, 2016

Tips For The Perfect Wedding Cupcakes

When we were talking about wedding cupcakes versus a wedding cake, there were a lot of opinions, but one that rang loudest was Erica M., who said she was making cupcakes for her boyfriend's mother's wedding.

The wedding came ... and so did her gorgeous cupcakes.

Thinking about wedding cupcakes instead of a cake? You can make your own as long as you stick to these tips for the perfect wedding cupcakes from www.abrideonabudget.com.

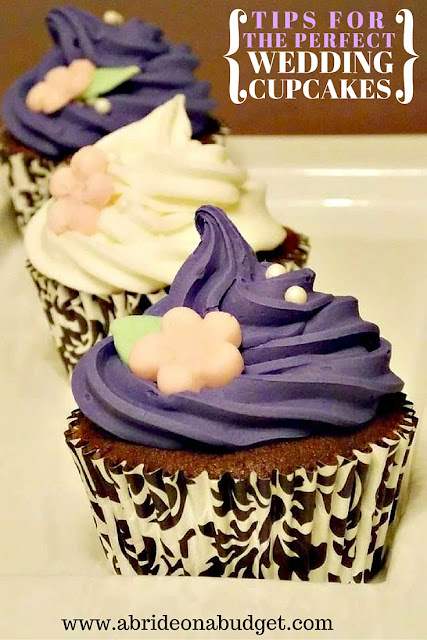
These look professional. From the touch of the embellished cupcake liners to the perfection of the icing on top, these are absolutely perfect and wedding worthy.

For me, a piping bag and tips don't make gorgeous icing. They make an uneven mess on top of a cupcake. I start steady and then I lose it at the top. So these would be out of the question. And baking eight dozen like Erica did, wow.

I asked Erica (who does this as a hobby for family and friends, not professionally if you can believe that) if she could share a few tips. I thought it was asking for a lot and definitely didn't want to put her out, but she happily obliged and typed up a list of tips that would definitely help everyone. So if cupcakes are your passion, you're gonna wanna print these tips out. Seriously. They're amazing and helpful and I want to publicly thank Erica from the bottom of my heart for taking the time to type them and share them with us.

Tips For The Perfect Wedding Cupcakes


Take it away Erica ...

Here's a few tips/rules to live by when making cupcakes: 
1. Make sure everything is at room temp unless it says otherwise, everything combines easier. (There's also some sciency reasons why but I wont get into that right now lol.) 
2. For cupcakes that are uniform in height, use a #20 ice cream scoop for standard size cupcakes. One scoop will fill the liner to the correct amount and takes the guesswork out of measuring batter for each one. (You can find a picture online of these scoops if you want, its just an ice cream scoop with a yellow handle).
3. Avoid over-mixing the batter! So many people do this and wind up with hard or brownie like cupcakes. The key to light fluffy cupcakes is to create small air bubbles in the batter by mixing them lightly. I always hand mix my batter with a spatula towards the end, a stand mixer can easily over-mix it.
4. Don't open the oven every 5 minutes to check on them!!! lol. Doing this lets out more heat than most realize and can make the cupcakes (or anything for that matter) not rise properly and you may wind up with a lopsided cupcake. Not a pretty picture huh?
5. Always have a good attitude when baking and take pride in your work! If it's worth doing, it's worth doing right!
6. Always always always level out dry ingredients with the back of a butter knife. I can't even begin to tell you how many times I've eaten a cookie or cupcake that has way too much flour or baking soda/powder in it. It doesn't taste good!
7. Quality ingredients = quality product
8. Preheat your oven before you start mixing and measuring everything. A preheated oven should be at temperature for at least 20 minutes to ensure proper baking.
9. When frosting a cupcake using a pastry bag, do a couple of test swirls first! It'll help get your technique right and it gets those first few big air bubbles out. I find that holding my bag at a 45 degree angle gets me the best swirl when using a star tip.
10. The last and most important tip: Have fun doing it!! Baking is an enjoyable experience and can be done by anyone at any skill level! Don't worry about making a mess, it's part of cooking and can be cleaned up later. Relax, enjoy the smell of fresh cupcakes, taste the frosting, and be happy!
I love her tips almost as much as I love her wedding cupcakes. I'm going to print these myself and tape them to the inside of my recipe book. My fave tip was the one that the oven should be at temperature for 20 minutes before baking. I had absolutely no idea about that (and truth be told, I used to never pre-heat the oven -- shh).

Now that I told you which tip was my fave, I want to know yours.

BRIDAL BABBLE: What wedding cupcake tip did you find most helpful?

Tuesday, March 29, 2016

What Is Bridesmaid Dress Shopping Like?

Wedding dress shopping was so hard for me ... but bridesmaid dress shopping? Oh, that was a breeze! I didn't have to do anything but watch my bridesmaids put on a fashion show for me.

But, really though, what is bridesmaid dress shopping like?

I loved bridesmaid dress shopping. Have you gone yet? Find out what it's really like on www.abrideonabudget.com

If you go to a chain dress shop, you can check the styles online before you go. Most will allow you to search by color, which is a good way to sort. Since your bridesmaids dresses really need to match your wedding colors, you want to eliminate any dresses that aren't in your colors (and avoid potentially falling in love with that dress and then needing to change your entire color scheme).

I actually did this with my maid of honor the night before we went bridesmaid dress. I texted a bunch of photos with huge bows and puffy shoulders to my bridesmaids, joking that I would be picking those. But, really, I found a dress I loved (although it only came in wisteria, not eggplant like I had originally wanted for my bridesmaids), but went to the store with an open mind.

Three of my bridesmaids met me at the store the next day. Before they started trying on dresses, the consultant asked for their shoe sizes. She wanted them to try on dresses while wearing heels (which is what you do when you're wedding dress shopping too). She brought over a few pairs, then asked for their dress sizes so she could grab the closest samples.

I sat in a chair. That's basically all I did for most of the time we were there.

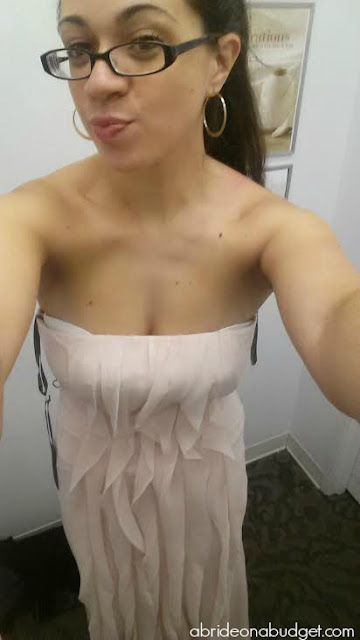
I told the consultant about a long gown I saw online that was just incredible. It had ruffles down the front and was perfect for our summer wedding at the beach. She grabbed three so everyone could try it on simultaneously. It looked amazing on two of my girls ... but looked like a mess on my maid of honor, so it was crossed off the short list.

The consultant pulled a few other samples for the girls to try on, but I was underwhelmed. So I left my chair and rummaged through the racks. I found a few I liked, so the consultant left to pull them for all three girls.

There was a dress that all three of them looked great in ... but it looked like they were going to a club rather than to a wedding. Maybe a guest or two might show up in something like that, but it wasn't bridesmaid-appropriate.

And, finally, after trying so hard to not just go with the one I found originally, I gave in. I asked the girls to try that one.

I loved bridesmaid dress shopping. Have you gone yet? Find out what it's really like on www.abrideonabudget.com

Of course, as luck would have it, I just loved it on all three of the girls. They were all different shapes and sizes, but they all looked beautiful. I just knew that would translate well to the other bridesmaids who weren't able to make it to shop with us. I was upset that it didn't come in eggplant, but our colors were eggplant, lilac, and silver. Since lilac and wisteria are just different ways to say similar colors, I had to decide what was more important: having a dress I loved or having a dress in a darker purple hue. I told myself that since it was summer, the lighter dress would look better, and I abandoned my dream of bridesmaids in eggplant.

This is why I'm warning you to filter by color before you even look at dresses. You don't want to fall into my situation.

I said yes to that dress and, as the consultant went to grab paperwork, one of my bridesmaids encouraged me to ring the "Say Yes To The Dress" bell that's usually reserved for brides ... which I did, ever so quietly, after the consultant turned the corner.

She came back and took down the names of my bridesmaids who were there and asked what sizes they wanted to order. And that's the hard part. You may not exactly try on a dress in your size or you may be in-between sizes and you'll have to get the dress altered. Plus, between shopping and ship time, you might lose a couple pounds and that could change your dress size. So you need to order the closest size, without going under (basically, the opposite of The Price Is Right). If you order a size too small, there won't be any extra material to make the dress bigger. If you order a size too large, though, you can always take it in or up.

The bridesmaids who were there ordered their dresses immediately (and then we went out for pizza). The others had to call the shop, give my name, and then they could order.

When the dresses came in (and the arrival times were staggered, based on size availability), the shop called the girls to pick them up. Whoever needed alterations got those done, and they all showed up in perfect dresses on my wedding day. It was the first time I had seen all my bridesmaids in the dress and I couldn't have been happier. No one complained (not to me anyway), so I think they were all happy too.

BRIDAL BABBLE: What was your bridesmaid dress shopping experience like?

Monday, March 28, 2016

How Moving Day Is Just Like Wedding Day

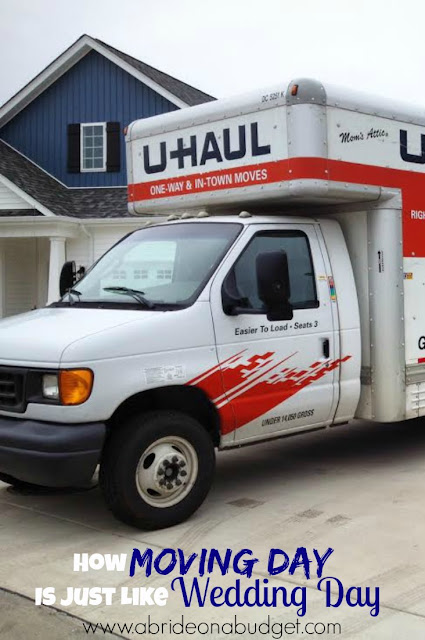
If you follow A Bride On A Budget on social media (we're on Facebook, Twitter, and, as of two weeks ago, Instagram), you may have noticed I didn't post any photos of Easter bunnies or crosses to celebrate yesterday. Instead, I posted a picture of a moving truck. Because -- after much house hunting and then a decision to just build a brand new house -- Pete and I (and out cat, Totes McGotes) moved into our (first and) forever home.

So instead of spending Easter weekend coloring eggs and eating chocolate bunnies, we spent it loading boxes into a moving truck. We were very lucky to have friends and my parents help us ... but as I was stressing over questions about what should go where, it got me thinking about how moving day was just like wedding day.

How Moving Day Is Just Like Wedding Day


Believe it or not, wedding day and moving day have a lot in common. Just how much? Find out at www.abrideonabudget.com.

You Have To Coordinate A Lot Of "Vendors" Before The Big Day
When you're planning a wedding, you have to get in touch with a ton of vendors before your wedding day. You need to pick a venue, choose the flowers, book a DJ, get your dress, on and on, right? And, you do this all before the wedding day so everything is set to go at your wedding.

Moving is the same way. You need to pick a house, choose a mortgage company, book a rental truck, get your water and electric set up, on and on. And, you do all this before moving day so when you get into your home, you have lights and the ability to flush the toilet.

You Need Friends To Help
If you remember my post about what no one tells you about your wedding day, I told you that you need that one set of friends. At the end of the night, all your guests and bridesmaids and vendors leave and you and your groom are left to clean up the venue. And so, you need that set of friends who will help you pack left behind favors and pieces of cake and then take them home for you.

You need those friends on moving day too. And, funny as it may be, we had those same friends who helped us pack up our wedding help us pack and move to our new home. I kept telling Pete all day, "These are good friends. They're good people and we're really lucky to have them." But, realizing they are the same ones who stayed behind at our wedding (and aided in my super secret guitar gift for Pete and brought me socks to our wedding reception because I forgot to pack some), they really are good friends.

You Need To Delegate ...
On wedding morning, everyone asked me what they could do to help. I asked one bridesmaid to keep track of the rings, I asked my dad to hold onto the envelopes with tips in them, etc. I kept handing out tasks as people asked for them because, really, I needed help.

The same with moving day. I needed to tell people what boxes had to go down first, what furniture went in what room, etc.

... And Then You Need To Just Relinquish All Control
Finally, on our wedding day, I just gave up. I was getting stressed trying to figure out where everyone was and what everyone was doing. It got to a point where I didn't care. I had faith in my planning and the people I had delegated tasks to, so I just let the day go off as it should.

Same with moving day. Eventually, I just gave in. Instead of trying to tell everyone how to pack and what to put in certain boxes, I let everyone pack extra stuff in unlabled boxes (meaning we slept without proper pillows on our first night because they were in a box that I didn't pack). But it had to get done and, so, I just let it.

At The End Of The Day, It's Just You, Your Spouse, And Your New Life
When all is said and done on your wedding day, you're married. Everything that happened over the course of the day led you to being married, your souls fused together, and you and your spouse starting the rest of your lives together.

And that's how moving day was too. When everyone went home, Pete and I sat on the couch in pajamas, watching Dateline, eating microwaved popcorn. And it was perfect. There was no other way that I would have wanted to spend that moment and no one else I would have wanted to spend it with.

BRIDAL BABBLE: What part of moving day felt like wedding day to you?